
- On sheeting materials used for roof decking and for sub-floors, as shown in Figure 1,
- On wood and composite material siding, as shown in Figure 2,
- On hardwood flooring, as shown in Figure 3,
- On engineered hardwood flooring, as shown in Figure 4.
Note: You may note that the tongue on the tongue & grove plywood, as shown in Figure 1, is not milled out of the plywood, as it is in the case of the composite material, hardwood flooring and the engineered hardwood flooring. In order to save material and have a stronger joint, grooves are milled into all four sides of the plywood. Where a tongue is needed, a hardwood spline is inserted in the groove. You can actual see the inserted spline in Figure 1.
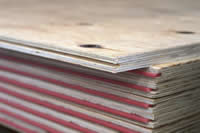
Figure 1 - Tongue & groove plywood
Figure 2 - Tongue & groove siding
Figure 4 - Tongue & groove engineered hardwood flooring
The intention of the tongue and groove joint is to merge two pieces of lumber together. The joint itself provides little mechanical strength as it is uncommon for an adhesive to be applied to the joint surfaces. However, when used to cover roof rafters or flooring joists, the tongue and groove joint provides strength when load is applied to the unsupported edge of a panel or board as it transfers edge load to the mating sheathing.
Note: Do not confuse the tongue and groove joint with the interlocking joints used on laminate flooring, as the joints used on these types of flooring materials are designed to interlock the material tight to each other.
Note: In some cases, especially with engineered flooring an adhesive is used to give added strength to the tongue and groove joint.
In many cases the tongue and groove joint will appear on all four sides of the material – two tongues and two grooves.
The tongue and groove is usually formed in a symmetrical pattern, meaning that the groove is one third of the thickness of the lumber, in the center of the lumber. Hence the tongue is also one third of the thickness of the material in the center of the material.
In the case of siding and finished flooring the tongue and groove joint helps to prevent warping and twisting of individual boards as they are kept in place by being locked into adjacent boards.
When used in outdoor siding materials the tongue and groove joint also helps to prevent wind, rain, sleet and snow from getting underneath the individual pieces of boards during inclement weather conditions. It should be noted however, that the tongue and groove joint is not a weather sealed or waterproof joint.
Tongue and groove joints used to be popular when attaching the edges of long boards in order to make a wider board, such as the top of a table. However, relatively new techniques in wood joinery, primarily the use of biscuits, coupled with the use of veneered plywood and particle board, have all but eliminated the use of tongue and groove joints in table tops and in other furniture applications.
If you need to create a tongue and groove joint the easiest method is with the use of a router, as shown in Figure 5 and a set of tongue and groove bits
, as shown in Figure 6. Depending on the physical dimensions of the lumber that you are working with, tongue and groove joints can also be made using a table saw
, and dado saw blade
.